Tuesday 15 November 2011

New parts

Last couple of days I have had arrivals coming in ex-usa, paid a few bucks extra for 'express delivery', the reality of this was that it wasnt really worth it, alas, without further ado, I give to you;


Mopar performance aircleaner P5249807

http://www.summitracing.com/parts/DCC-5249807/

I made a mistake ordering this one, I had led myself to believe I was selecting a 14" filter with a 1-1/4" drop base with a 3" filter height, hopefully the hood will still clear.


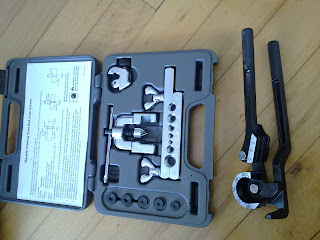
OTC tools deluxe double flare kit, and OTC tools heavy duty tubing bender.

http://www.summitracing.com/parts/OTC-6503/
http://www.summitracing.com/parts/OTC-6515/


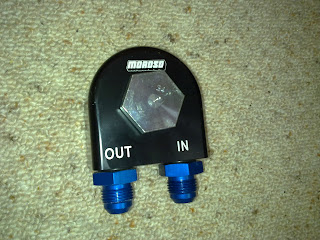
Morosso battery box


Massive, sealed, affordable and comes with heavy duty battery tiedown hardware, not to mention its NHRA and IHRA approved, it will hopefully make scrutineering a lot easier at Fram Autolite Dragway, Meremere, now that the track has gone IHRA for sanctioning. Its also one less job that I now no longer require a custom solution to, which will save time and hassle, so it should all be worth it in the end.


ARP Header bolts

http://www.summitracing.com/parts/ARP-444-1202/

Nothing really to explain here, just remembered I need header bolts, my headers are currently attached by about 4 mixed type bolts each.


Hang out for the next few updates, I have been able to source some VJ vented discs (and associated hardware) for a good price, and Im set to have some time finally to work on the car.

Tuesday 25 October 2011

the DOI

The horse is following the cart on this one, that is if I was still trying to get this car on the road for summer, but the major interior pieces that I needed to get sorted have been purchased. Not that it makes the car any more roadworthy, just complete .... at least this summer it will be sweet sitting in a nice car making car noises pretending to drive never mind the fact the car doesnt steer or brake.
The seats are back from retrim, and they look great. Excuse the crappy cellphone pics.

Front bench, chose to delete the ashtray in the seat back, no one is going to be smoking in this car.

Rear seat base, the seat back is just out of picture.

Picked up a new carpet from autodec here in Auckland, they were great to deal with, not only affordable, but Shaun was very friendly to deal with, its nice buying car parts from guys who are in the business for the cars and not just peoples money. Picked up a new factoryish matching 'blood red' sedan carpet, boot carpet and enough underfelt to do the car which should hopefully cancel out a lot of the road and old car noises but I doubt you could do anything to hide a worked V8. Fitting the carpet sounds like a bit of a mission, but its a chance to do it once and do it right.

Sedan carpet, boot carpet, underfelt. Once again sorry for the cellphone picture, colours just dont come out right.

This is an attempt to show the correct colour in the pic, close.


Other then that I have been spending a lot of time on trademe and reading through other peoples builds that have been posted online. There seems to be a fair few valiant pieces making there way onto trademe at the moment at $1 reserve prices, seems people are doing their spring clean out which is good for guys like me who havent been able to find these bits for months. Cheers for reading and I will keep you posted as the car gets pieced together.

Friday 14 October 2011

Im not dead, and neither is this project!

In advance, sorry for the lack of updates .... or seemingly progess. This car is still on track to be rolling around come new years.

The seats are back from getting retrimmed and look great, sorry dont have any good photos yet, although I will have to get some when the interior is back together for sure.

Have tracked down a guy who can do a moulded carpet for me, in NZ and in auckland, for less then what the ozzys charge which is great, will order that within the month.

Have all the bits together to do the oil filter relocation, adaptor are filter block are moroso, lines and fittings are earls/aeroquip in -10AN. Not sure if I want to run an oil pressure gauge, the plug is currently blanked.


Moroso oil filter adaptor block with aeroquip -10AN male to male unions


Moroso oil filter block with Aeroquip 1/2" NPT plug, and 2X 1/2" NPT to -10AN unions


2X 6' Earls -10 braided hose and Earls -10 AN hose fittings


Also on a quick trip to the states with work I bought back a few heavier items, namely a mini starter, MSD APS branded, and its small!!! more room for headers and exhaust Big Grin Along with a whole stack of mustang parts for my mate (he got a set of munroe shocks, 2" drop spindles, as well as a bushing and ball joint kit) ... one of the joys of being in the aviation game was this cost me nothing for shipping back home with me. It would have been $100 in shipping for the cheapest option to get the starter from summit, so now im really wishing I had bought back a lot more stuff.


That should give you some perspective on size, grunty enough to turn over a high compression big block mopar (or a worked small block in my case), yet small enough to leave heaps of room for an exhaust in a forward mount configuration like my VC, remembering the starting is in competition for space in the engine bay and right where anyone would want to run their pipes.


So as it stands im currently on the look out for;

-A complete front disc brake swap from master to safety valve to discs/rotors/stubs/ball joints.

And currently saving for;

-A new moulded carpet (have already sourced a supplier)

-A rack conversion (elko / PP&R style k-member, although might still come up with a local solution)

-5x4.5" stud pattern wheels and tyres

-redrilled and studded rear axles and new 5x4.5" drums

and still to import;

-double flare brake line kit
-IHRA approved battery box and tie down
-Alloy radiator and electric fan

Monday 11 July 2011

Rack ATTACK!!!

Today I got a rather speedy email reply back from elko, and its looking promising.

The solution to the rack dilema could come in the form of one of their modified k-frames, which they are willing to sell to me seperate from their kit, which im hoping will be cheaper then buying another kit outright, enabling me to use the parts i already have.

this is what their kit looks like
And here is what it looks like installed


Pretty good huh? makes for a near factory appearance, and according to many VC owners accross the ditch superior handing over a cradle mounted rack and pinion, due to much less flex in the whole setup.

Saturday 9 July 2011

AND IF WE HAVE TO, OVERNIGHT PARTS FROM JAPAN

... Well maybe not, Summit Racing more like it.

further onto fridays issues, is sundays solution.

this oil filter as it sits will be replaced with this

attaching via -10 AN fittings and some of this

which will plug into one of these


which will be mounted on one of the front wheel tubs, where there is actually plenty of room.
Although tempted to use cheaper cast components from budget manufacturers, or even a whole kit which would have cost the same as the moroso adaptor block itself, I restrained myself and remained mindful that this is a big ticket item, I need the oil system to work, and to work well if I want this engine to last. Its one thing popping the diff doing driveway burnouts, its another thing blowing an oil line, dumping all the oil, running a big end and wrecking a crank in the middle of nowhere halfway from somewhere that I need to be and all over saving a hundred dollars or so. As it stands I may well have to sleeve the braided line in fireproof sleeve to help protect it from header heat as everything down the sides of the block will be tight. It almosts makes me wonder how chrysler managed to produce a V8 option on this model, I havent seen one up close, but I expect it to be messy, I believe my install will be much cleaner and perform.

This maybe the last update for a while whilst I save some dollars, send some emails, and do some research into getting this rack back on track.


CUSTOM COMES ONE CUT AT A TIME

Following in on from thursdays international call to hemiperformance, the factory steering box and idler mounts were in the way and had to get the chop, a plan was hatched and early on friday morning, I rolled out of a warm bed and into a cold flannel shirt.
Shit just got real.
I pushed the heavy valiant down the drive unaided and somewhat hindered by its independent front steering, yet I managed to get it loaded up into the parents garage the only way a forty boy knows how, cargo strops, with enough cargo strops any object of any size and any weight can be moved by anyone. Not too long after my uncle and master panel beater Roman Swierczynski (of classic-restorations fame) turned up to give me the much needed guidance and direction. Well thats an understatement, he basically did the lot, cheers!!!
Jacked up, axle stands .... blah .... who cares? heres some hot metal ....


As always a lack of photos is evidence of an abundance of progress.


Mounts were cut off, shaved smooth, rack cradle lifted up, now the brake line brackets were in the way, due to the complex multipoint star stamped into these they were carefully trimmed away from the chassis rail, the last thing needed is to rush to failure. This 'simple' install was not at this stage looking like it was going to be completed in a morning.


First snag.

Drivers side, using the existing steering box mount hole, as directed in the very misleading instruction sheet.

The mounts were drilled for the existing 7/16" hole somewhere around 10-20mm out ... at this stage we had a stop work meeting, and a decision was made to press on, albiet to do as little as possible to dummy the rack up and get it in place, the wheels moving in unison, and the car able to be rolled around much easier.

Passengers side


Second snag
 

Although difficult to tell from the one photo I had taken to display, the rack position is SHIT!!! It sits a solid 20-30mm too far forward.

Third and final snag, which only became apparent later in the failed install.


The red plastic in the above photo is a protective blank over the rack input spline, it is pressed hard against the oil filter, which if you could see behind it is the window which the steering column attaches ..... Time to pack up for the day.

The leaking front pressed steel wheels, which were spoted due to the morning dew, were loaded into the domani and taken to firestone, were i had the valves replaced and instructed that they were in very borderline condition for running tubeless.
The car was put back together and dropped back on its feet.

Problems, I have them, its time to engineer some solutions.


Friday 8 July 2011

GOAL ONE ..... GET IT ROLLING!

My main aim for this trip down was to sort out what the car needed in the way of spares, mission accomplished for now. Much back slaps and good times all round, I could even relax with a cider this afternoon after heading down the adventure park so I could run around like a kid and play on the equipment.

The secondary objective came about due to the car being stored at the parents for now at least, and the fact that my mother would most likely kill me if i left in a state in which it couldnt be moved around and got the hell out the way should the need arise .... the hemi performance rack and pinion kit would have to be installed.
This kit promised to be the ultimate bolt on solution to the rubbish steering box (and assorted idlers, arms, linkages, etc) that these cars sported when they rolled out of Todd Autobodies Petone. With more room for the big american engine which had no design consideration given to being mounted in a RHD vehicle, and as such, in a compact car, its all a bit of a squeeze and space is at a premium beneath the heads and between the chassis rails ... every bit helps.
In between times though the stock bosch starter had a stuffed solenoid and so had to be removed to be fixed, when i got down to taking it out space proved to be of a premium on the left hand bank also, and a quick check on summitracing.com proved there to be a multitude of 'mini' small block mopar starters with the correct 10-tooth pinion, these badboys claim to have twice the grunt of the stock starter which should help turn over an angried up mopar mouse motor, as well as being half the size of the stock starter, with space at a premium it will help fitting an exhaust later on in the build. Settled then.
On removal of the starter the wiring wasnt really at the standard I desire, the boot was much the same, a battery box was provided, although not fitted which may be a blessing in disguise as it gives me a chance to install it to the specifications required should this vehicle hit the strip. A lot of old copper core fabric wrapped wiring remains in the car, powering the brake lights and turn signals, as much as I respect the originality of it, for piece of mind and perhaps saving later 'epic' road trip nightmares, I am budgeting now for what will be pretty much a complete rewire.

Getting back to the rack in a round about fashion, the factory dog dish hubcaps were removed, revealing a broken stud on the left drum, perhaps due to an accident with the bizarre mismatched threads used on opposite wheels on these cars based on the long since past insistance on using left hand threads on the left side of ALL rotating parts, and right on the right.
Not to worry though, this car would not fly through a mod certificate with the factory drums ... not like it would fly through an intersection when I would rather it slow. This car has been built to go, so now it must be built to stop. At the moment im still keeping my options open, as im still yet to sort out the rack. But I did find these bad boys on summitracing.com which I found by looking at the exact same kit on an australian website listed for a price too rich for my blood, then cross refencing the kit to wilwoods comprehensive catalogue of available kits and finding the part number, which i plugged into summits search engine, low and behold, its in stock and features all new parts.
The rusting wheels which were originally fitted with 6.5"X14" crossply tyres, is now fitted with near new 195/60R14 Supercats, running a very low performing 10 psi in the fronts, I took these to the servo once the car was on jacks to get them pumped up.

Up onto stands .... hemi performance rack moved into position ..... nope .... it doesnt fit .... WHAT ... THE .... F&^&!!!!
An international call to australia, was greated with these pearls of customer service 'ohhhh mate, VC's are the worst things ever' .... 'nah mate, these things are a nightmare aye' .... 'we dont recomend them for VC's' .... 'what do your instructions say' .... 'it might have been a prototype' ..... 'Yeah those mounts will have to go' .......
A plan way hatched to the next morning slice and dice my chassis rails till they were naked and smooth them out, like old school rodders say "custom comes one cut at a time"

So much for a kit that would have ripped someone off to the tune of NZ$2000!!!! once the dollar had been converted over, the item shipped, and customs had stung you for duty. Not impressed to say the least, I can not recommend this kit.

Pics to follow. along with the next days (attempted) install